GBC - How Hard Can It Be?
Apart from my dark-age gap of about 14 years, I've built Technic since my parents bought me set 850, the forklift from the first wave of Technic sets in 1977. I've a thing for tinkering with mechanisms. I take things apart to find out how they work, and put them back together.
When my first motorbike died I had two options: buy another engine, or buy tools, parts and a book to repair/rebuild what I had. So I learnt what an engine looks like on the inside. I've always had GBC on my "some day" project list. It's a long list, and I'm not a prolific builder, so it's taken me a while to actually get started...
Gotta Start Somewhere
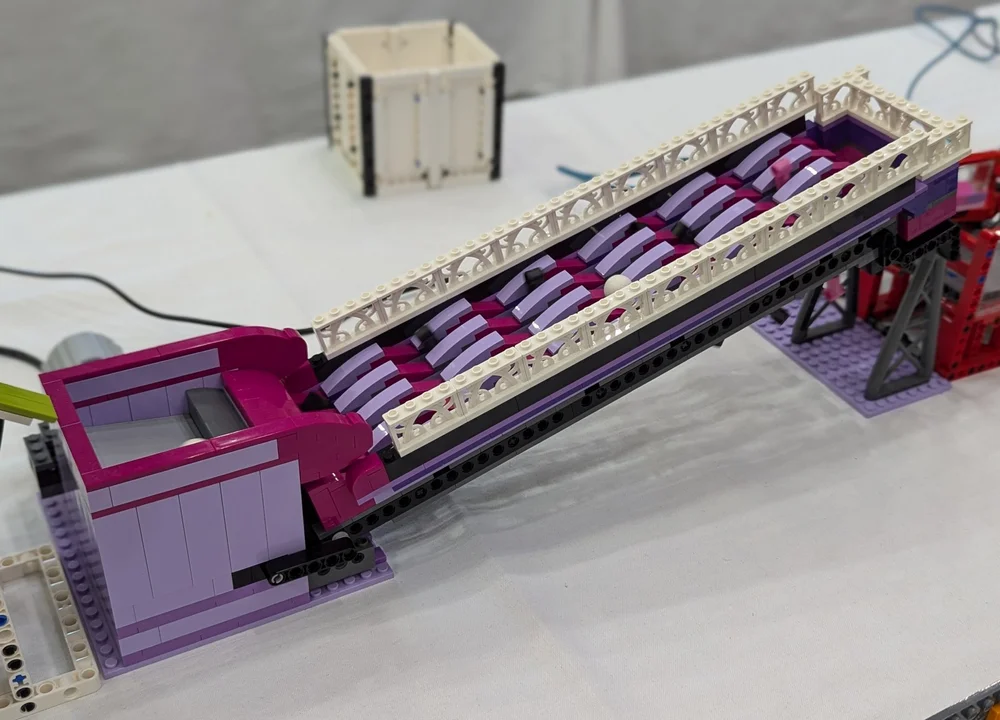
My first GBC module
Last year I built a module using leftover parts from another project; lavender bricks and curved slopes, and white fences. It ran as a guest module in Huw Millington's GBC loop at our annual event and didn’t break down. Much.
This year my LUG decided to run a GBC project, and as the one-eyed king in the land of the blind I was appointed project manager. So I had to have another go. Let me tell you what I learnt while building my first GBC modules.
First of all, I assume you know what GBC is? Great Ball Contraption is a loop of LEGO contraptions that serve no other purpose than to move balls around in an endless loop. There’s a great Bricknerd article about its origins. Some people call the GBC modules Rube Goldberg machines, but that’s not entirely correct. They’re equally pointless, but a Rube Goldberg machine typically is a single chain reaction of many mechanisms, while a GBC module typically repeats the same movement over and over again and balls keep going around and around…
Walk Before You Run
Some day I would love to build something as awesome as Akiyuki's Ball Factory, but I haven't quite reached Jedi Master level yet. So I started by having a look at what's out there. It turns out there are some base mechanisms that a lot of GBC modules are based on. So let's take a closer look at those.
Conveyor Belt
Conveyor belts are everywhere in factories, and LEGO has produced a few different ones, mainly used in Technic sets. Balls are not easy to transport on a belt, but luckily put plates on the old Technic treads or pins in the new ones to hold the balls. That makes a conveyor belt a convenient method to lift your balls up.
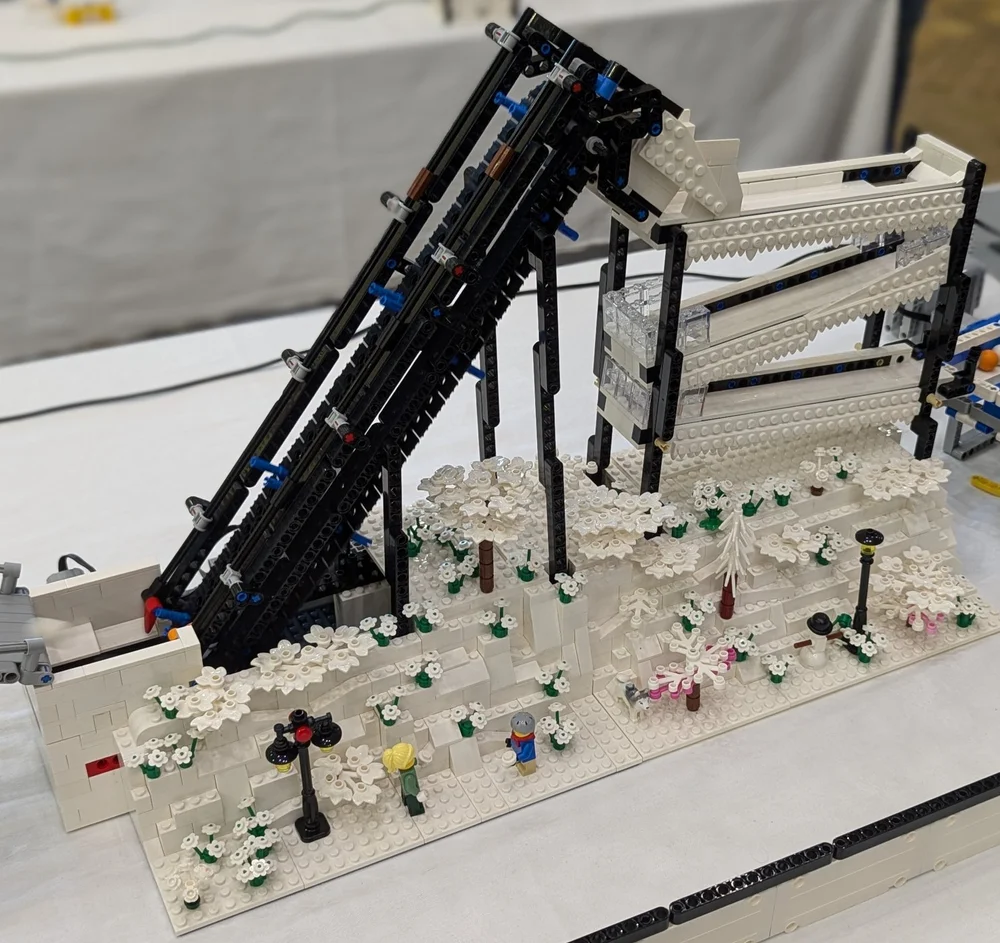
Conveyor Belt by brick.ie member Snowy
Here's an example of a simple one. The video also shows what you can do if you build multiples:
Stepper
The stepper mechanism is like stairs, but they move in two halves. When I was growing up we'd have a House of Fun at the annual fairground and it would have stairs like this. The trick was to switch between the left and right side of the stairs at the right time. Get it wrong and you’re doing the splits…
With clever use of cheese slopes you can make the balls switch sides when their step reaches the top of the movement. It’s not easy to explain, but this video demostrates it nicely.
Planet GBC has instructions for a simple stepper module, that shows its mechanism.
"Wheel of fortune"
I've seen this name use on GBC sites but I'm not sure where it comes from... The wheel of fortune I know from TV lies flat. The GBC wheel though is near vertical, so the balls rest against the wall behind the wheel. The spokes of the wheel scoop the balls up at the bottom. At the top there's a gap in the wall that the balls fall through.
Here are instructions from a Brickworld workshop in 2021: Wheel of fortune pdf.
Ball Pump
This mechanism pushes ("pumps") balls into a stack. When a ball is pushed in the whole stack goes up but thanks to a one-way valve they can't come down. This is a slightly more advanced module but the advantage is that it can quickly reach decent heights, and it looks good.
Planet GBC again has a nice one that reveals the mechanism.

Finding Instructions
All my Technic treads were in use and my wife had already started work on a stepper. With those two options off the table I decided to build a ball pump. It's a compact module that can be customised in many ways so it seemed like a good starting point. With that decision made I started looking for instructions. How do those ball pumps actually work?
GBC builders are a very generous bunch and there are many sites with free instructions. I've already mentioned a few above but there are more. You can of course find instructions on Rebrickable , but also for example on GreatBallContraption.nl. That site is run by Maico Arts, a prolific GBC builder from the Netherlands who also has a Youtube channel with lots of GBC videos.
Brickworld Chicago has run GBC workshops for a number a of years, and the instructions for those modules can be found on GreatBallContraption.com.
I picked the 2018 Brickworld Chicago workshop kit instructions to get me started.
Start Building
I like to make life difficult for myself, so rather than exactly following instructions, I took them as inspiration and made some changes. I made it a little longer, and changed the exit of the hopper a little, as well as the gears for the agitator, and changed the tower. I liked the open design that I’d seen during my searches.

My version of a GBC Ball Pump
For those not familiar with GBC lingo, the hopper is like the inbox of the module; it's where the balls arrive. The height of the hopper is fixed in the GBC rules so in theory any module can follow any other module.
An agitator is sometimes used inside the hopper. Sometimes it stirs the balls, sometimes it moves the floor, to make sure the balls don't get stuck. Balls really like organising themselves in regular patterns that won't move, and the agitator prevents that from happening.
Troubleshooting
Once the module was built of course it all worked fabulously the first time I turned it on. It did actually, and ran for at least ten seconds before it self-destructed. I found out the hard way that there's more to a hopper than just a box with something moving around to stir. It matters how tall your stirring stick is. It matters how long it is. What shape it is. How fast it moves. How close to the walls of the hopper it is. It matters what shape the hopper is. And the floor of the hopper. And the exit. You get the picture…
Get any of those wrong, and instead of gently disturbing the balls to make them gently leave the premises in an orderly fashion it may leave them in a stable, packed configuration where the balls refuse to go through the exit. Or violently eject them.
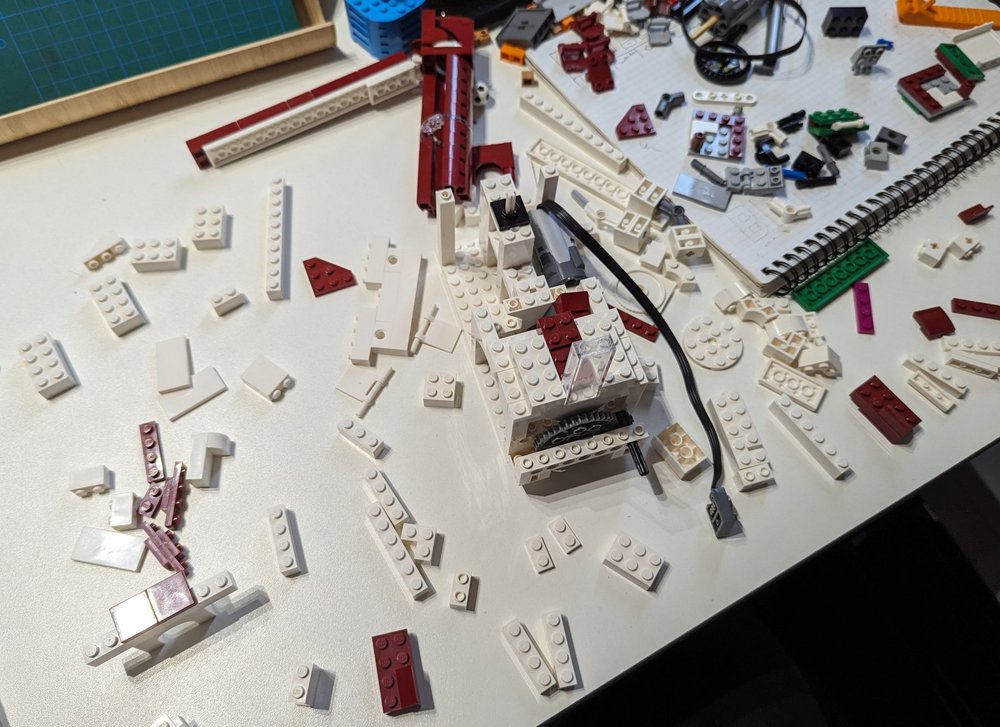
One of many rebuilds…
The next tricky part of a ball pump is moving the balls from the exit of the hopper to the piston that pushes them up. The Brickworld design uses two pistons. The first lifts one ball at a time over a wall where it rolls down onto the second piston, which lifts it up through the one-way valve. A very simple mechanism, but like with the hopper, details matter. The shape of the channel. The height. The surface and shape of the pistons. This section too was rebuilt a number of times.
Finally there's the chimney. GBC balls (minifig footballs and basketballs) are slightly smaller in diameter than a 2x2 brick. That's great right? That means they fit through a 2x2 channel without getting stuck. That's the theory.... In reality it means that they don't sit perfectly straight on top of each other, and that means they can jam. User “LEGO 48” on Youtube has made a good video explaining the challenges of ball pumps.
After more rebuilds than I care to remember I got it to a point where it worked well on the kitchen table. During our event it still managed to inexplicably jam a number of times... So why is it so hard to create a reliable mechanism with LEGO bricks?

“Production Release” of my ball pump. My wif'e’s Lifter module is on the right
LEGO Tolerances, Brick Details
LEGO is famously proud of the accuracy with which it produces bricks - and rightly so. As you've no doubt heard, read or experienced, a brick you buy today will fit on a brick from 60 years ago. Since 1963 (most) LEGO bricks are made of Acrylonitrile Butadiene Styrene, or ABS to friends. LEGO's injection mould machines produce bricks to an incrediblt tolerance of 1/200 mm (or 1/5000" if you're that way inclined).
So that's all good news for building intricate mechanisms, right? Well.... Let's take a closer look at LEGO bricks and how they're made. If you've been around LEGO for a while you probably know the basic dimensions. A 1x1 brick is 8mm wide, 9.6mm tall. Five plates stacked on top of each other is 16mm, the same as a 2x2 brick. That's the theory...

Brick Dimensions by Christoph Bartneck
If bricks were exactly that size, they'd jam up against each other and they'd be hard to put together and take apart. That's why we have air-gaps. Bricks are a fraction smaller than their theoretical size - about 0.1mm. You can see the gaps, especially with light from behind. The height should be exactly 9.6mm but it isn't. It's close though. But if you build a large section sideways you'll notice that it doesn't line up exactly.
The side walls of a brick are not perfectly vertical, a brick ever so slightly tapers to the top. The reason: it allows bricks to come out of the mould. Speaking of moulds, they have two parts, an inside and an outside. Sometimes they are not exactly centred, and the walls on one side of a brick are thicker than on the other side. It won't affect clutch, because the size inside is correct. It's also unlikely to be off by more than the size of the air gap.
A long time ago I had a set with two inverted arches that just would not fit side by side. Then I swapped them around and they easily fit, but with a visibly bigger gap between them than normal. In this case the inside part of the mould was so far off-centre, and affected the two arches on opposite sides, that the air gap wasn't big enough to absorb the error.
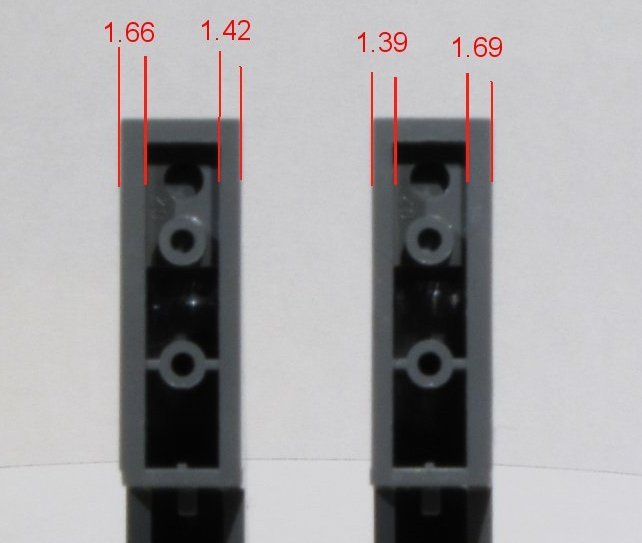
Thick and Thin. Sometimes bad bricks slip through quality control
The gap between two studs is 3.2mm so the 1.66mm and 1.69mm walls did not fit side by side.
What's All This Got To Do With GBC?
These tiny details can affect how well two parts of a GBC module slide up and down alongside each other. We found when we were troubleshooting that sometimes just turning a brick around was the difference between smooth running and jamming, because it meant the difference between being flush with the brick below it or protruding ever so slightly.
A Quick Look At Technic
Technic beams are very different from bricks. Just look at all those holes and the lack of studs. But there are other differences too. The beams have softer, slighty rounded, edges. They don't need to form smooth walls when they are connected. Bricks have 6:5 height:width ratio, but Technic beams are as tall as they are wide - or very close. A quick measurement with my trusted caliper showed that bricks were on average 7.86mm wide. Technic beams were on average 7.83mm high, but "only" 7.38mm wide. Half a millimeter doesn't sound like much but it makes a big difference.
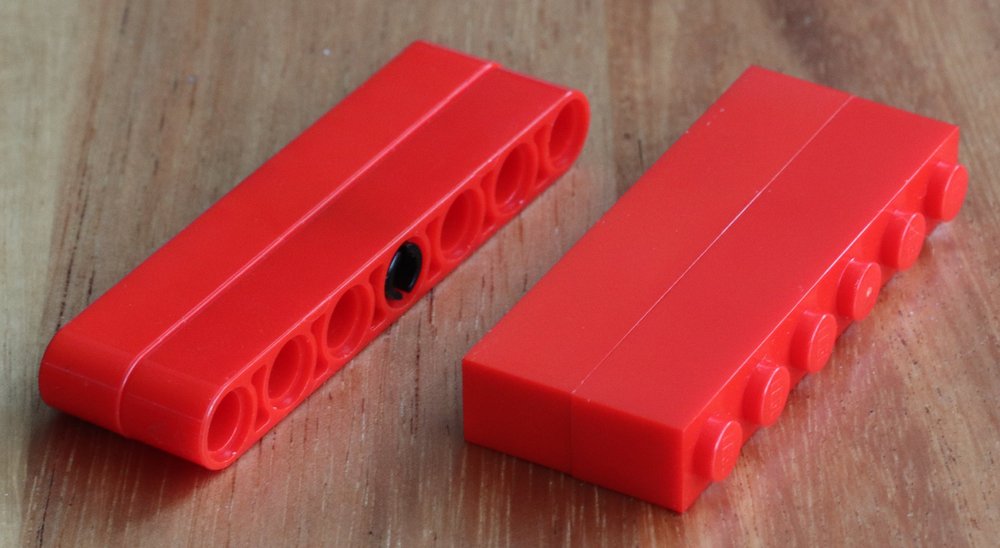
Bricks vs Beams. They are very different indeed. Note the rounded edges and more obvious seams between beams.
Brick GBC vs Technic GBC
All this helps to explain what we found out the hard way building our GBC modules. It is much easier to build your GBC with Technic parts - at least the moving parts. That half a millimeter, combined with the "softer", rounded edges of Technic beams means there is almost zero chance of jamming or snagging. Of course that doesn't mean everything you build out of Technic is indestructible... but I'll write more about that in a future article.
What Did We Learn?
We (my wife and I) both built a mostly Technic based and a more System based GBC module, and we had plenty “Teachable Moments” along the way.
When you build a GBC module you need to check each component moves freely as you build it. Like you do when you build a Technic set.
Testing at home must be a proper endurance test, not a 5 minute “Yup, that works” test. Something will fail during your test. Figure out what failed and why.
When you follow instructions, follow them. It may not be obvious while you build, but every piece is there for a reason.
When you’re troubleshooting, start with the basics. Take off the motor and move parts by hand. You will feel resistance and snags.
Fixing issues can be really simple if you’re lucky. As mentioned earlier, sometimes it’s just turning a brick around, or replacing a part with an identical part, just because the tolerances can be slightly different.
Bring spare parts. They’ll be the wrong ones (that’s Murphy’s law for you) but they’ll give you a fighting chance of fixing issues.
At our event I was so busy running our train layout as well as the GBC repair shop that I realised later I had very few pictures of the GBC loop. I’ll leave you with a photo of my wife’s Blacktron-themed Lifter and Stepper.

Lifter and Stepper module
Oh, I almost forgot the biggest thing we learned: GBC is fun! We’ll do it again!
Have you ever built a module for a Great Ball Contraption? Have you ever measured a LEGO element with a caliper? Let us know in the comments below!
Do you want to help BrickNerd continue publishing articles like this one? Become a top patron like Charlie Stephens, Marc & Liz Puleo, Paige Mueller, Rob Klingberg from Brickstuff, John & Joshua Hanlon from Beyond the Brick, Megan Lum, Andy Price, Lukas Kurth from StoneWars, Wayne Tyler, Monica Innis, Dan Church, and Roxanne Baxter to show your support, get early access, exclusive swag and more.

